Search This Blog

Saturday, February 18, 2012

Keeping little treasures

Do your children give you scraps of paper where they've written "I love you" or have drawn sweet pictures? And you don't know what to do with them because you can't keep everything their little fingers have touched? Well, mine do, and if yours do the same, then maybe this post will help you.

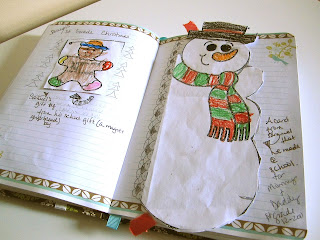
I'm a fan of Smash books - I have three I purchased recently, but I actually started one of my own using the same concept, but with a regular journal instead of one with the offical "Smash" name.

I found this journal at TJ Maxx, but you can find them just about anywhere! The concept is simple. Just "smash" the item in the book using staples, glue stick, etc. I like it because I don't feel I have to go to my craft room and scrapbook an entire page for every tiny, little, beautiful item my kids make for me. I also like it because it is completely informal, but I can added embellishments if I'd like or not ,and I've saved a valuable piece of paper.

I might add that I do get giddy whenever they make something for me. I don't want to sound like it's a nuisance that I have to find a place to put it, because that's not the case. However, it's a common thing among households with children so I wanted to share.

I keep my little treasure journal, as I call it, on the kitchen counter in a basket. That way it is completely accessible at pretty much any given time.

Since I use it so often, my kids have started their own "smash" books and they feel proud when they see me put their little handy work in mine.


Like I said, it's not formal, but it still holds my treasures in one location for safekeeping and I like that!

Valentine's Day recap

My first parties planned for Valentine's Day as a room mom are now over. I really looked forward to them. A lot of planning for a 45 minute party, but really worth it. In the previous post I talked about the photo booth and other stations we put together for my daughter's Kindergarten class and how we also used the photo booth for my son's first grade party. But, I didn't get to show you the gifts I made. Maybe these will be helpful to you.

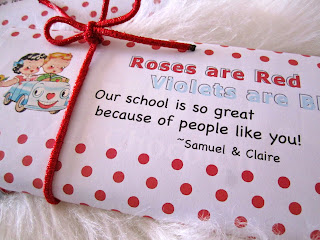
I designed a few candy bar wrappers for King-size Hershey bars. I gave one each to the school secretary, principal, bus driver and my children's teachers. Here is what they looked like:


I found the adorable image of the vintage kids in the car here: http://www.freeprettythingsforyou.com/

I also made treats for our reading helper, nurse and librarian. I put them in little buckets that I found at Target in the $ section and added a handmade tag:


I made the treats, wrapped them in treat bags and secured them with a pink pipe cleaner that I shaped into a heart: 


I found the treat recipe here Tasty Kitchen. I used round pretzels instead, but everything else is the same.

Here are pics of my children's Valentine's Day boxes for school: 

My son is really into Legos right now, so we made a lego brick out of a box and those small, plastic condiments containers. We put the lids on the containers so they would attach easier. I spray painted the entire box. It was pretty easy to make!


My daughter wanted a robot. We wrapped two different sized boxes and wrapped them with pink wrapping paper. We also wrapped toilet paper rolls as well. We added pipe cleaners for the arms and she decorated the rest. It was a lot of fun!


Well, that's it for Valentine's Day 2012. Now, I'm back to working on my family's history album, plans for St. Patrick's Day and more! 
: )

Friday, February 17, 2012

Valentine's Day Parties

This year, I had a lot of fun planning the Valentine's Day party for my daughter. After researching many ideas, I decided to come up with a photo booth station and an "I-Love-You" hand station. Two other stations included one for snacks and another for reading Valentines. The other volunteers were awesome and always good sports when it comes to my somewhat over-thought out ideas.

For the photo booth station, another Mom brought coloring pages in so the ones waiting to have their picture taken could color and keep busy. It worked out great. The kids really liked getting in the cardboard box!

I used an old patio furniture shipping box that my kids had used for a while. It was rather beat up, but I was able to salvage it for the booth. My husband was also a good sport and wanted to help me cut the box the way I needed it. I had him cut off the bottom and top, as well as the back panel. Then, I asked him to cut out a square in the front where the kids will be looking out for the picture.

Once it was cut, I spray painted it white, let it dry and added heart cut-outs that I cut using my Slice. I also added trim, which was just bulletin board trim I bought at the $ Tree. I used the back part, which is white, and decorated it with hearts I drew on with a red Sharpie.

My son's class party was right after my daughter's and I used the booth there as well. The parents also wanted a picture in the booth with their child. It turned out to be a real hit!! I'd definitely recommend it for your class parties in the future! I know I'll use it again. I didn't draw directly on the cardboard so all the decorations I used can be removed and replaced with other designs.

Here I am with my son in the photo booth:

The other station I came up with was the "I-love-you-hand" station. We showed the children the sign for I love you in sign language, then had them trace their hands, cut them out, decorate them, and finally bend the middle two fingers down for the I-love-you sign. I don't have any pictures, but it turned out very cute! 

Monday, February 13, 2012

Ladybug clipboard gift for Valentine's Day

My husband's sister lives in Germany. She loves ladybugs, so for Valentine's Day I decided to put a little package together for her. I made a ladybug clipboard and included a King-size Hershey bar covered with a wrapper I made.

Clipboard:


Candybar:


clipboard details:


Items included in package:


I included a couple Valentine's I made from the kids. I got the idea where it looks like they're holding a lollipop from Pinterest


Valentine's Day Lego T-shirt

The other day, I bought my daughter an adorable outfit that will be perfect for Valentine's Day! I got it 70% off! I don't usually like to spend a lot of money on a shirt or outfit they can only wear once, so when I saw the price was 70% off, I couldn't resist.

This caused a dilemma, though -- I have an outfit for my daughter to wear on Valentine's Day, but nothing for my son. It's harder to find cute Valentine's shirts for boys, I think. I wanted to come up with something on my own that doesn't cost a lot, but makes a nice statement.

My son likes loves Legos and I knew I wanted to incorporate that into my idea somehow.  A Lego t-shirt would be nice. Then I remembered 'I can design a t-shirt'! If you need something quick for a boy or girl to wear for Valentine's Day or any other special occasion and they won't need to wear it too many times, then this is a great idea for you, too!

Here's what I did:

Step 1: I bought a white t-shirt at Hobby Lobby for about $4. I already had the inkjet transfer paper, but you can get that there as well. The packet is $8.99, but I bought mine with a 40% off coupon. There are 7 sheets, so you can make even more!

Step 2: I designed my Lego man with a heart, then reversed it because it will be the mirror image once it is ironed on the shirt. The same with the words "Happy Valentine's Day"

Step 3: Print the design on transfer paper.

Step 4: Cut out the design making sure to leave a border because the color can bleed if too close to the edge.

Step 5: Hold up the shirt and pat myself on the back because it's pretty darn cute!!!

If you'd like this for your Lego-loving son, just check out my Etsy shop. It's only $3 for the design!!!

Start with a plain white t-shirt


Print and cut out the design, making sure to leave a border when you cut out the design:


So cute and ready to wear for Valentine's Day!


Happy Valentine's Day!